Introduction
In this post I’ll describe a little implementation of a custom “format file converter”. Its a small python script to convert files in the Wacom WILL file format to SVG. Wacom is a company that manufactures drawing tablets. A couple of months ago I purchased a Wacom Bamboo Slate [1]. I always wanted to have an A4 sized drawing tablet to be able to doodle around and have all stored digitally. The Bamboo Slate sounded as a perfect solution for my case because, with it, you write or draw in normal paper and the tablet captures the strokes while you write/draw.
One of the specifications I demanded before buying the tablet was the ability to save in the SVG format. SVG is vectorial, open and XML based and we have APIs to read SVG practically in all languages. The Bamboo Slate had that option in the app, so I decided to go for it.
One of the reasons I wanted to have a vector format for the digital versions of the doodles was to be able to “time lapse” the work. For drawings, that would generate a cool movie of the drawing being made, but for the writing it would have a more important purpose. I use to do my maths in paper. It helps me to “flow” when I deducing a formula or just expanding an equation. Most of the time, I want to keep what I wrote. Scanning in general was the only solution. The problem with scanning is that I loose the “time” of the writings (like the sequence of formulas that some times gets “distributed” across the page 😅)
The problem
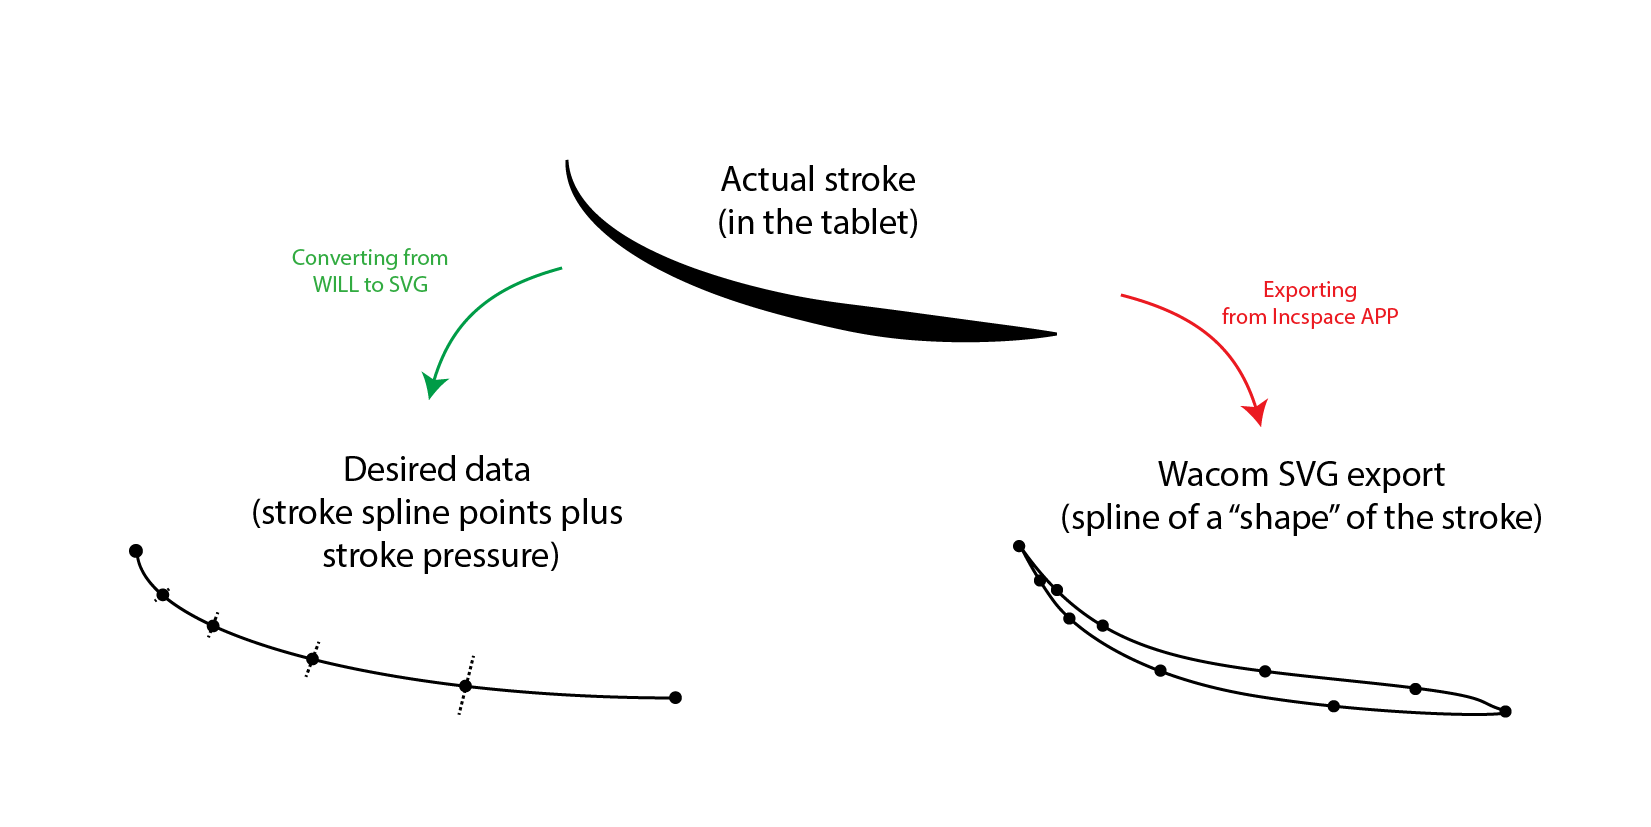
With the tablet in hand, it was time to do the first test. So I doodle a bit with the pen and synchronised the tablet with the app which we can use to export. When I exported to SVG I had an unfortunate surprise. The lines are not SVG line elements. Since the pen is pressure sensitive, in order to export the “thickness” of the traces, the SVG contains, for each tree, a polygon with the shape of the line, not the line itself 😢.
So, I didn’t have the information I wanted, which was the “path” followed by the pen. Rather, I had a bunch of “worm shaped” polygons that “drew” each like segment. What I wanted was, for each path, I would like to have a bunch of points and, for each point, the “pressure” of the pen for that point. I did not believe that the Wacom would store the lines as shapes! So, I tried to understand the e-ink format that Wacom uses (WILL file format). This was supposed to be an universal and vectorial format specialised in storing drawing strokes. And it it! It turned out that the WILL format stores exactly as I wanted. Figure 1 tries to illustrate the difference.

It seems that SVG do not have the specification generic enough to store pen and pressure data. But that was a pain, because SVG is text XML based file so its very easy to read. WILL, on the other hand is a binary package that stores a bunch of extra information that I didn’t care about (like images snapshots, descriptors, etc).
Formats and standards
For what I intended, the pressure data was not important. I wanted the path points to be able to do my time lapses and/or any other business that would require the geometry of the traces (not the “drawing”). Hence, I was still interested in exporting to SVG, but this time, each stroke would be a line not a little digital “worm”. It turned out that both formats would store path as bezier curves, so that was good for me. However, I had to read the WILL file in order to extract only the bezier’s control points and save them to SVG.
SVG
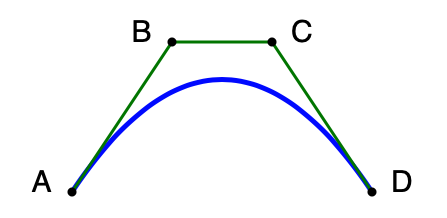
The format SVG is a pretty big and versatile format for vector graphics. It is basically an XML file with elements that represent shapes, lines, etc. For this project, I just wanted to store bezier segments. That can be done with the tag <path stroke=”…” d = “…” > </path>. In this tag, stroke is the parameter for the color of the line (as a simple html color tag like #000000) and d is the data for the points. The d parameter is a string with “pen commands” and coordinates. We use only the “M” and “C” commands. “M” is the move to command, which moves the “pen” to a given position. “C” is the “curve to” command, that draws a bezier curve with the given control points. So, the data “M 100 200 C 200 50 300 50 400 200” would draw the blue line bellow

WILL
The will file format is the format used by Wacom to save the strokes that we perform on the tablets. It is a format created specifically to store strokes from digital ink tablets. It can store, pen color, size, pressure, type and etc. As a file, it is a zip file containing a mini file system that stores a lot of information. It can have jpegs, svgs and others. In one of the directories there is a file that, in general, is called strokes.protobuf.
strokes.protobuf is the file that contains the data about the points where the pen passed. As explained in the Wacom website, the points are stored as splines that follows more or less the same behaviour of the bezier curves in the SVG. In the case of the splines the curve tangent is given by the neighbour points. Moreover, each stroke path has two parameters called start and end which mean a parametric variable “t” that normally is 0.0 for start and 1.0 for end. That can be used to describe the “speed” of the stroke (which I ignore in the project since I notice that, for my tablet, I always have 0.0 and 1.0).
All paths are stored as “messages” in the stroke file. The structure of those messages are
message Path {
    optional float startParameter [default = 0];
    optional float endParameter [default = 1];
    optional uint32 decimalPrecision [default = 2];
    repeated sint32 points;
    repeated sint32 strokeWidths;
    repeated sint32 strokeColor;
}
The “points” and “strokeWidths” are stored as “deltas” which means that they are the difference in position from the previous values.
Finally, the messages are stores in a simple “size” + “buffer” sequence as showed in the following table:
| Description | Bytes sequence |
| 128bit varint | Path 1 message length |
| bytes | Path 1 message bytes |
| 128bit varint | Path 2 message length |
| bytes | Path 2 message bytes |
| … | … |
| 128bit varint | Path n message length |
| bytes | Path n message bytes |
protocol buffers
After reading the format described in the Wacom WILL file description, I got really exited to implement reading of the WILL file and writing of the SVG. It looks pretty simple and intuitive! Well, if the story have ended there, I would not be writing this post, since it would be a boring post 😅.
As the extension of the stroke files suggests, the “binary format” of the data contained in the file is the called “protocol buffer”. This is where the fun really stated for me (fun in the sense of not being a trivial task to do). After a simple google search about this “protobuff” format, I found a google documentation explaining the whole thing.
Basically, a protocol buffer is a protocol (set of rules) that states how we decode information in the sequence of bytes in a buffer (array or sequence of bytes). I always liked “decoding” stuff from a sequence of bytes and had a lot of fun in the past trying to reverse engineering protocols in byte sequences. In particular, I used to “hack” files from saved games. I use to use hex editors to open the binaries from the game save files and looked for places where the number of life, number of coins or ammunition were stored. I remember being bad at Sim City because the first thing I always did was to save a initial city, open the saved file and increase the money to 2^32 dollars. Then I cut the taxes to 0, people were always happy and I had fun building all kinds of stuff with practically infinite money 😂😂😂.
But going back to this post, this time Google helped me with the dirty work. In in general, when a protocol is defined at “byte” level, things a simple. For instance, to read a float, you read 4 bytes and perform a “typecast” inverting or not the order of the bytes. In the case of the protocol buffer format, the protocol is “bit” based, in the sense that some times you have 4 bits to mean something the next 6 to mean something else. In that case, you have to read byte by byte and perform low level bit “wizardry” to get the information out. For that low level bit hocus pocus, Google made available a bit manipulation library in python that I could use to decode the buffers present in the strokes.protobuff file. But the library only had function to do the basic manipulations needed. The “walking” on the buffer and the reading of the data in a structured way had to be made by myself.
Here I’ll try to explain a basic decoding process of the strokes.protobuf using the google.protobuf api. The bit format of the protocol description can be found in the google protocol buffer page. The protocol uses the concept of messages to store data. The messages are key value pairs where the key specifies the type of the “value” in each message. All protobuf messages present in the strokes.protobuf are either sequence of bytes (to encode floats for example) or individual (or sequence) of varints values.
varints are variable size integers that are stored with a variable number of bytes. If the value is small it will use less bytes. So, the general procedure for reading a protobuffer is to, starting from the beginning of the buffer, read a key (stored as a varint) and, depending on the value and size of that varint key, advance to the next position on the buffer where you read the value for that key. To do that, there are basically three important commands:
google.protobuf.internal.decoder._DecodeVarint32
google.protobuf.internal.decoder.wire_format.UnpackTag
google.protobuf.internal.decoder.struct.unpack
_DecodeVarint32 This is function that do the binary wizardry to get an integer out of a buffer. It receives the buffer and a position to start the decoding of the number. As output, it returns the number itself that it had decoder, and something else. The big question is, what else could this function return? It returns the next position in the buffer (where you would find more data). This is exactly the point of Varint types. The size of the byte representation depends on the number itself!
UnpackTag This function takes an int32 value and interprets it as a protobuffer tag. It then returns the field and type of that tag. In fact field and type forms the “key” for the protobuffer key value pair. In the WILL protobuffer file, field is a number from 1 to 6 as explained before. Type is a number that indicates the type of number (see protobuffer reference). For instance type = 5 means a fixed 32bit number (could be a float).
unpack This last function do the “regular” (non variant) bit cast. It gets a buffer and a type string and returns an array with the decoded values. For instance if we have an 8 byte buffer and the type string é ‘fi’ it will return the first element as a float and the second as an int32.
So, in order to decode a WILL protobuffer, we basically keep reading the buffer package by package (each one with 6 fields) and concatenate the XY coordinates that comes out of each package. Each package, we read the size, then we repeat the following actions: _DecodeVarint32 To get field and type. UnpackTag (just to check, since we know what to expect) unpack To get the values (for field 1 and 2 get float, for field 3 get precision, for field 4 points etc…
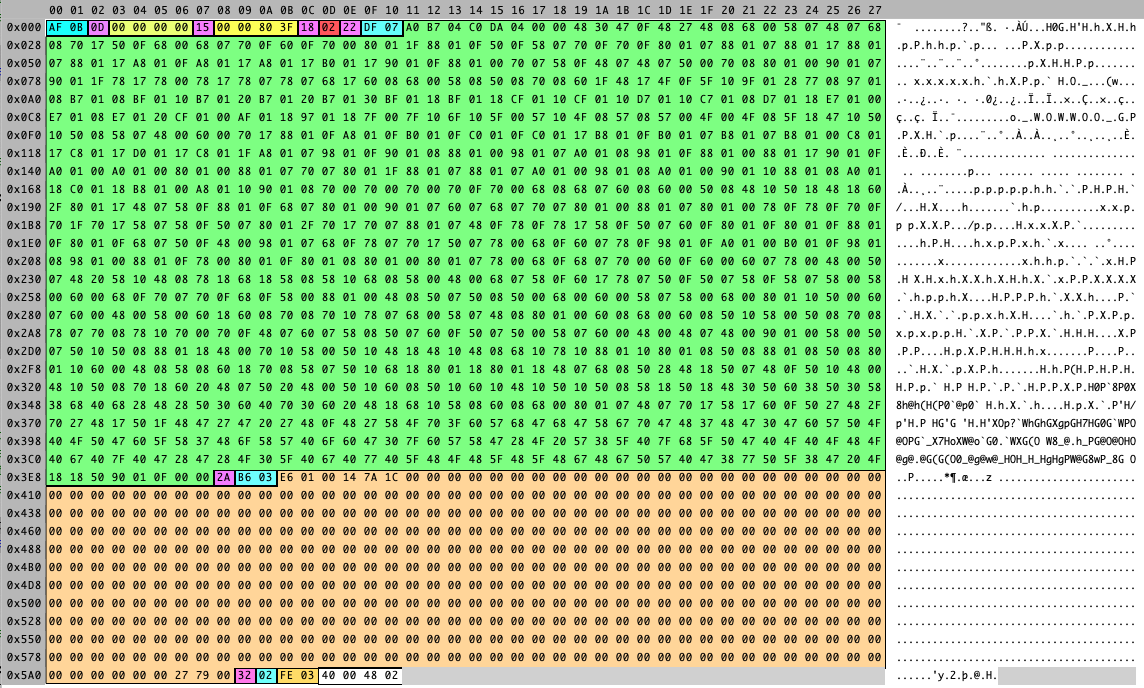
For the fields 4, 5 and 6, you get a “string buffer” which is a protobuffer in itself. Hence, the first decoding is the length and the following values are points (if field is 4), stoke widths (if field is 5) and color (for field = 6). The next figure shows one package with colours separating the fields in a Hex Editor. Each Magenta byte is a Varint key and the following data is the value. We can see the 6 fields. Cyan bytes are lengths and we can see that some Values are buffer themselves which need lengths as first content.

Result
The result is now a small python script that receives a WILL file and spits out the Correct SVD file with the strokes as single lines instead of a stroke “shape”. Just to illustrate here goes an example of a file. The first figure shows the plot made in the python script (taking stroke width into account). The second figure shows the preview of the clean SVD file generated by the script.


References
[1] = Code on GitHub
[2] = Wacom Bamboo Slate
[3] – Wacom WILL file format
[4] – Google protocol buffers
[5] – Wikipedia – SVG File format
